The Simply Complicated Automatic Sprinkler
I've never owned a sprinkler before. I've just never had a need for one.
Until this past Monday, when I installed some grass seed and couldn't promise myself that I'd water it twice a day every day for the next month as one is supposed to do.
A normal person would just buy a mechanical or stand-alone timer device and be done with it. Not me. No way.
My first thought (a completely normal one, mind you) was to grab an esp32 and a relay board out of my parts bin and liberally apply ESPHome to the problem. This didn't happen because I recently cleaned my office and put those parts in a bin that I can't quite find right now.
cough. Anyway.
My fallback plan was to grab a Z-Wave relay that was more readily at hand and just ("just") use Home Assistant as the timer.
Parts List
- Zooz Z-Wave ZEN17 Universal Relay
- Orbit 3/4" inline sprinker valve
- 3/4" NPT to garden hose thread adapters
- Generic 24VAC transformer
- 5 position terminal block
- 18AWG stranded two conductor silicone jacketed wire
- some random crimp on butt connectors I had laying around
- A sprinkler
In-ground sprinkler valves in the US pretty universally use 24V AC power. This is a very common signaling voltage for HVAC and other controls in residental settings so it makes sense. For example, non-smart doorbells are also generally 24-ish VAC.
The neatest thing about the Zooz ZEN17 (and it's friend the ZEN16) is that it can be powered by USB-C or 12-24 volt DC or AC. That means I can get away with just one power supply for the whole contraption without having to get any kind of fancy voltage regulator.
Sprinker valves come in a variety of sizes, none of which are directly compatible with garden hoses. In the US and Canada residental garden hoses have a universal connector size and thread: 3/4" NH (national hose) (or GHT (garden hose thread)), otherwise known as ANSI B1.20.7. So, I needed some thread adapters. Your local hardware store or supermegaglobal online bazaar named after a river in Brazil will provide you with many options.
Assembly
I didn't take any good pictures of the prototyping and assembly process. Hopefully these will be sufficient.
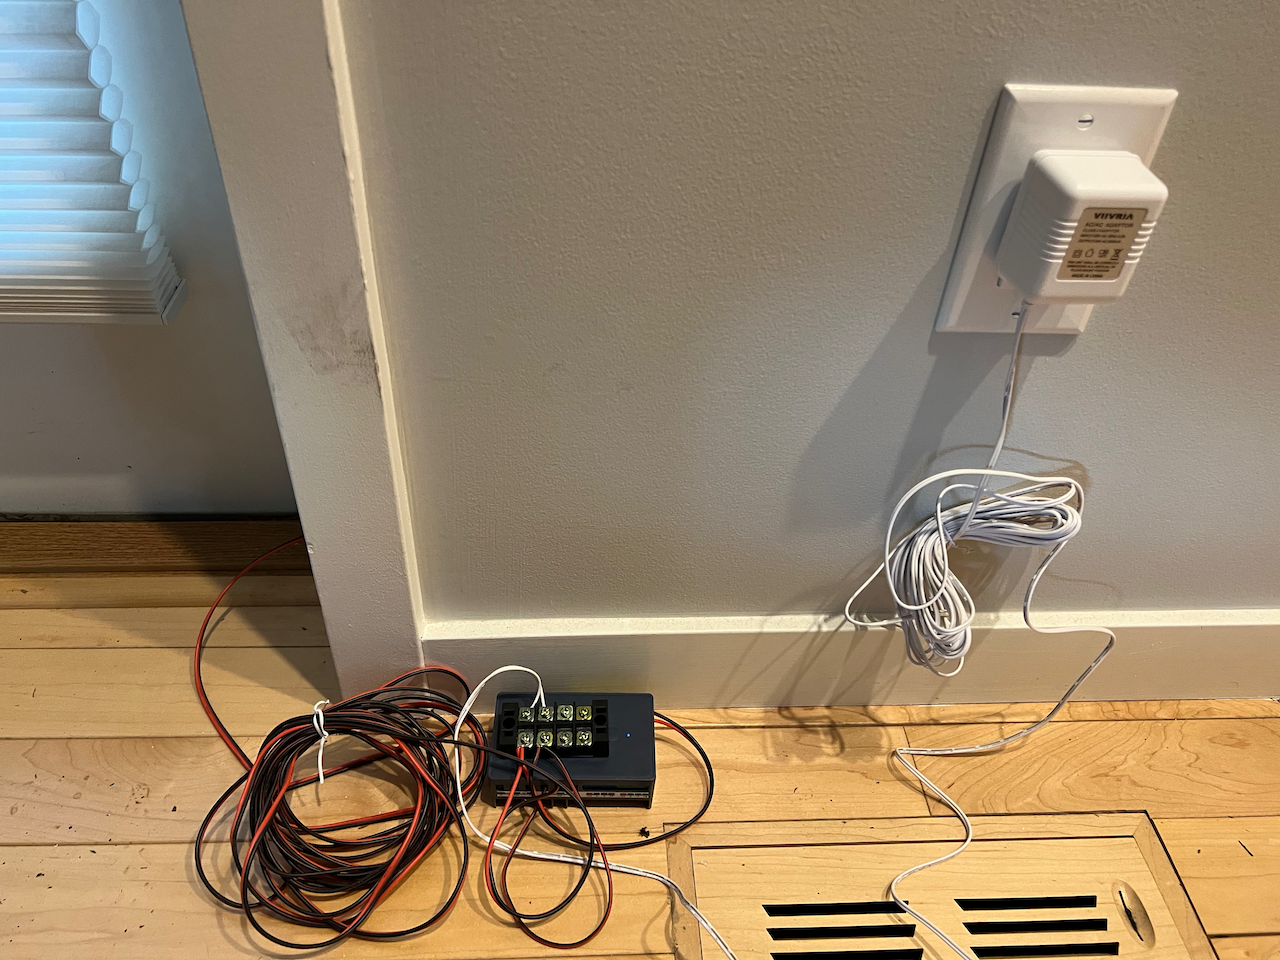
As you can see, the power supply is connected directly to the relay (via a small terminal block affixed to the relay with a command strip) and the red and black wires lead to the valve. One of the valve wires is connected directly to the power supply and the other is connected to the NO (normal open) terminal on one of the relays in the ZEN17. A short jumper wire is connected from the other leg of the power supply to the C (common) terminal on the same relay.
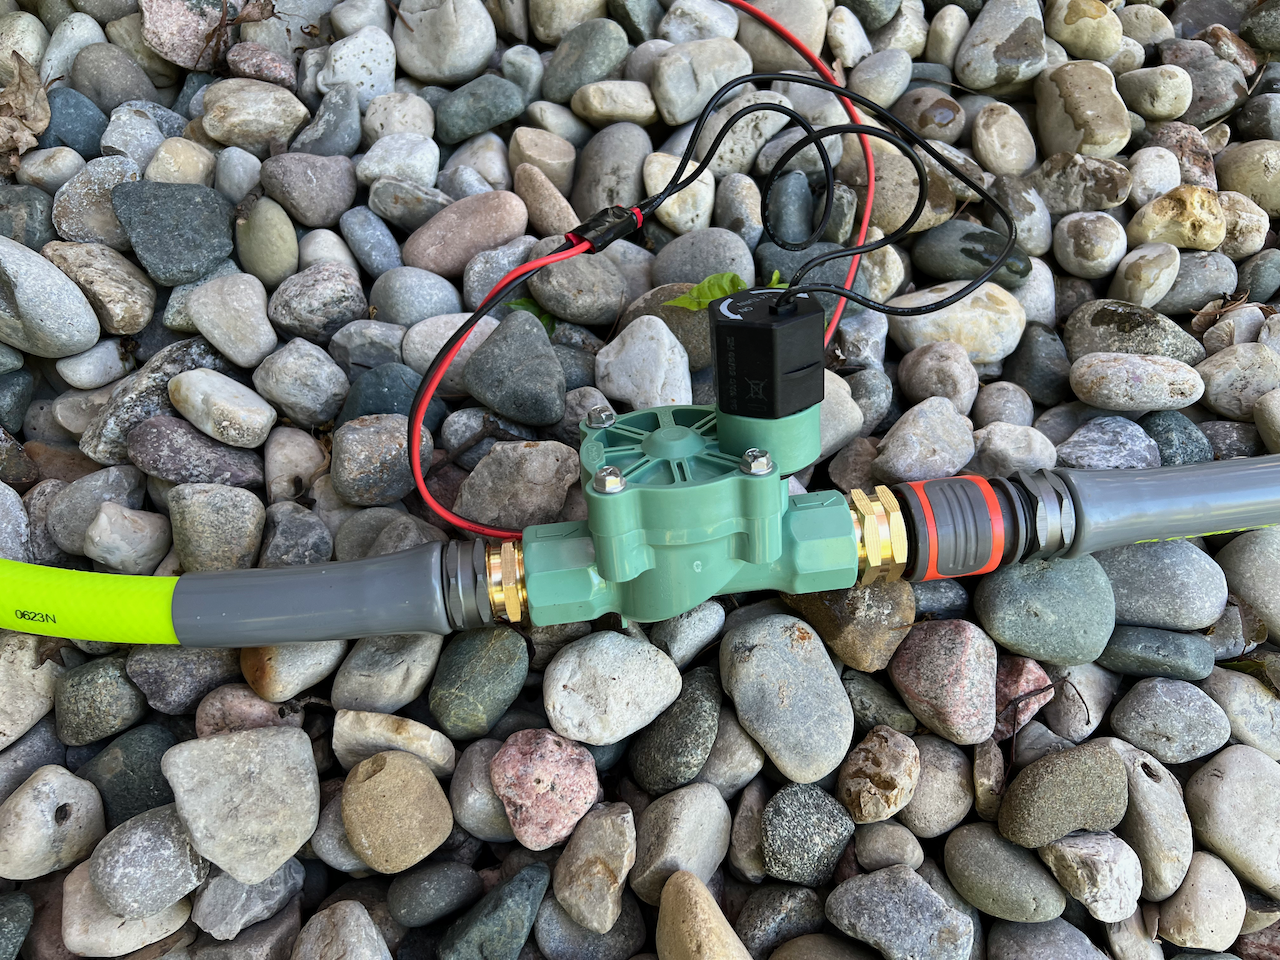
Here's a shot of the valve itself. You can see the green valve body, the black solenoid that activates the valve, and the brass thread adapters. You can also see the craptastic butt splice things I used, which will be replaced with proper waterproof junctions as soon as they arrive.
The grey and orange piece on the right is a quick release adapter. I have quick releases on the spigot and all of the hoses, which lets me easily install and remove the valve as needed.
Home Assistant
A generic relay isn't much good without something to control it, so let's turn to Home Assistant.
The central component of the sprinkler controller is a 5 minute timer helper which ties with two automations:
-
Sprinkler Start triggers at 8:30am and 5:30pm and starts the timer, but only if the forecast precipitation probability from OpenWeatherMap is less than 50%.
-
Sprinkler Relay triggers whenever the timer changes state.
Sprinkler Relay uses a Choice action with two branches:
- Timer active and relay off -> turn the relay on
- Timer idle and relay on -> turn the relay off
I also have a Time Pattern trigger on Sprinkler Relay that runs every minute. This acts as sort of a failsafe, so that if the timer ends during a Home Assistant restart, the sprinkler will shut off with at most an extra minute of runtime.
Here's Sprinkler Start in YAML:
alias: Sprinkler Start
description: ""
trigger:
  - platform: time
    at: "08:30:00"
  - platform: time
    at: "17:30:00"
condition:
  - condition: numeric_state
    entity_id: sensor.openweathermap_forecast_precipitation_probability
    below: 50
action:
  - service: timer.start
    metadata: {}
    data: {}
    target:
      entity_id: timer.sprinkler_runtime
  - service: notify.all_phones
    metadata: {}
    data:
      message: Sprinkler has started
      title: Sprinkler
mode: single
and here's Sprinkler Relay:
alias: Sprinkler Relay
description: ""
trigger:
  - platform: state
    entity_id:
      - timer.sprinkler_runtime
  - platform: time_pattern
    minutes: "*"
condition: []
action:
  - choose:
      - conditions:
          - condition: state
            entity_id: timer.sprinkler_runtime
            state: idle
          - condition: state
            entity_id: switch.universal_relay_1
            state: "on"
        sequence:
          - service: switch.turn_off
            metadata: {}
            data: {}
            target:
              entity_id: switch.universal_relay_1
      - conditions:
          - condition: state
            entity_id: timer.sprinkler_runtime
            state: active
          - condition: state
            entity_id: switch.universal_relay_1
            state: "off"
        sequence:
          - service: switch.turn_on
            metadata: {}
            data: {}
            target:
              entity_id: switch.universal_relay_1
mode: single
So, what do I have after all of that? I have a sprinkler valve that could be automated with a wrist watch but is actually automated by a Rube Goldberg-esque stack of technology, including radio protocols, ethernet, virtual machines, Python, Javascript, and Tailscale (because of course).
Simple!